Saturday, January 31, 2009

Two Projects

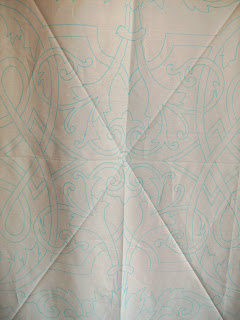
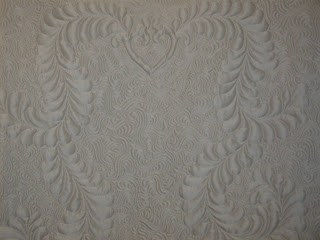
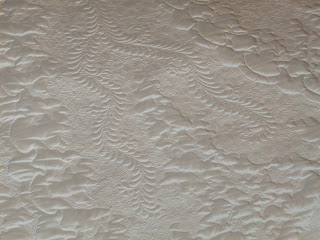
The cutaway trapunto is completed on my latest wholecloth quilt. This photo shows the back of the quilt after I spent 8 hours cutting away the trapunto batting. It doesn't look like much, but I'm hoping for a nice quilt once I've completed the quilting.
This is a little baby quilt made from a Moda Charm pack and extra yardage. This is for our newest addition to the family, our first grandchild, due to make an appearance sometime in February :D
Tomorrow will be busy with fabric postcards and cutting fabric for a mystery quilt, and hopefully starting on a customer quilt.

Wednesday, January 28, 2009

I've Been Tagged!


Ginny from GinnyQuilts has tagged me for the 6 Picture Meme. So here is the 6th picture from the 6th folder in my "My Pictures" file on my computer. It's a photo I took while I was painting a coral reef mural in my DDs' bathroom. The mural has more work on it now, but this is how it looked at one point on the wall and at one point in time during the painting process. I'm not much of a painter, but it was a fun project.
So to pass on the fun! Here are the rules: Go to your Picture Folder on your computer or wherever you store your pictures. Go to the 6th Folder, then pick the 6th picture in that folder. Post that picture on your blog and the story that goes along with the picture. Tag 6 other people that you know or don’t know to do the same thing and leave a comment on their blog or an e-mail letting them know you chose them.
My six chosen bloggers are all from the FiberArts Yahoo Group.
1. Debra from Patchwork Sanity - Debra is handpiecing Dear Jane blocks and has a list of links for BOM projects on her sideboard.
2. Kerry from Kerry Katiecakes2 - Kerry is knitting dishcloths and has a photo of a gorgeous round robbin block on her blog.
3. Sandy from Sandy Quilts - Sandy has a very interesting article about the new CPSIA law and how it may impact charities such as Project Linus on her blog. Please read this important article. This law may impact all of us who quilt and craft for charity.
4. Susan from JSWB - Susan, Miss Snips, is a writer for The Canadian Quilter Magazine and collects quilting tips from readers and bloggers.
5. Phyllis from Smitty74-Crafy Lady - Phyllis knits by hand and by machine. She just finished some hand-knit socks and has a photo of one of her 3 knitting machines on her blog. Very interesting!
6. Tammy from Two Tangled Threads - Tammy is a new blogger and has just finished a very pretty pennyrug.
Hop on over and visit these blogs and enjoy the diversity of these fiber artists' work.

Saturday, January 24, 2009

More Wholecloth Quilting


This is a photo of my current personal project. This wholecloth quilt design is from a Dover copywrite free image. I've made some modifications of the design to better fit as a trapunto quilt. I wanted something different from the feather wholecloth quilts I've done in the past. The quilt is rectangular instead of square and should finish around 76x60. I'll work on this after I finish 2 more customer projects.
The quilt on my machine at present is a charity quilt for the Kimberling Area Library. It's a beautiful redwork embroidery quilt. I finished the stabilizing quilting today and hope to finish all the detail quilting in a day or two.
The weather is in the single digits here in Mid-MO and that makes my unfinished basement studio a bit chilly - kind of like trying to quilt in a walk-in refrigerator! I managed to work in 45 minute segments today before having to come upstairs to warm up. Even the space heater wasn't much help. Cold weather makes quilting a bit difficult for me. Luckily the frigid temps aren't supposed to last long.

Test Samples


These photos are of the test sample that I made before quilting on the wedding gown quilt. The top fabric is a bridal satin with a mat finish. I have 2 layers of batting in this sample - Hobbs 100% cotton for the main batting and a 6.6oz poly batting for the trapunto batting. This is a faux trapunto quilt instead of a cutaway trapunto. I did not cut away the trapunto batting but quilted as usual. The 2 layers give a bit a a trapunto affect.
The backing fabric is a dupioni silk in an ivory color, and I bound this quilt using the satin fabric. The heart motif was traced onto the quilt using an air-soluble pen, and the feathers were freehand quilted.
I used Sew Fine 50wt. 3-ply thread #402 Pearl in the top and bobbin. The background is McTavished.
This test sample was for me to test the batting, thread and needle size to see what would work best. I used a 3.0MR needle for this sample. Once I got to the wedding gown quilt, though, I had to make changes even though the sample quilted up just fine. Since my remnants of satin and silk weren't exactly the same as the sample the results weren't the same, but it did give me a good starting point. I had to switch to just one layer of batting and use a size larger needle for the wedding gown quilt. The thread was the same, though.

Tuesday, January 20, 2009

Fabric Dyeing

Do you dye fabric? If so, what is your favorite method, products, etc.

I started out fabric dyeing about 9-10 years ago using fiber reactive dyes and the gradation dyeing with several buckets of dyes of the same color in gradations of saturation. Fun to do, took lots of time and lots of stirring of the dye baths. But, I wanted more than one color to come from a dyeing session. So I started the direct dyeing method by soaking my fabric in the soda ash, wringing it out and squirting different colors of dye directly onto the fabric. It was much more satisfying to me, but you have to wait several hours for the dyes to react with the fibers before you can wash them out, dry them and use them.

Then my kids wanted to get in on the fun. I premixed the dyes as well as the soda ash soak to keep the kids away from the toxic chemicals. They were allowed to squirt the dyes onto their fabric pieces, or clothing pieces as the case may be. We had many fun days of dyeing fabric and clothing and many interesting results!

One day I was watching a quilting show - America Quilts Creatively - where a representative from Rit Dyes was overdyeing commercial printed fabrics and setting the dye in the microwave! That sparked my curiosity and I had to try Rit Dyes. I used PFD fabric as well as bleached muslin instead of commercial prints and squirted the dyes directly onto the fabric. I wrapped them up in plastic wrap and microwaved them for 2 minutes on high. I absolutely loved the results! Bright, vivid colors with a suede look. Some of those fabrics are in my quilt top "Flight at Sunrise". That top also has some hand-dyed fabrics made from Procion MX dyes.

I have been warned that the dyes may fade out of the Rit Dyed fabric, but I haven't found that to be true. Perhaps the microwaving heat sets the dye enough to prevent that.

I still used both brands of dyes and use whichever suits my fancy at the time. My last dyeing session used Rit Dyes. I'm almost out of Procion dyes, so I need to restock my supply. My next dyeing session will also use the Rit Dyes since my girls want to get in on the fun. It's a bit less complicated to use and you get faster results - an important consideration for kids (and Mom's) who think they need instant gratification!

One of these days I'm determined to try Sunprinting. That's a project best to wait for warm weather, though!

Susan

Saturday, January 17, 2009

A Quilter's Ramblings

This week has been busy with one more customer quilt completed and a 2nd one in the works. I'm also working on designing another wholecloth quilt for competition. I'm looking for something a bit different from feather designs so I've been looking at library books on Art Nouveau, Celtic designs and Victorian ornamental designs. I haven't decided which way to go yet.


One thing I haven't found locally is cotton sateen in wide widths. I don't want to piece the top, so I purchased some Robert Kaufmann Kona cotton. It's silky and smooth and I'm anxious to see how it quilts up.


Another quilt in the planning stages is a Rhapsody quilt. I have Ricky Tims book and worked on a couple of dozen (really!) patterns last year, but was not satisfied with what I came up with. This past week, in between quilting and homeschool and researching wholecloth designs, I drew more Rhapsody patterns and came up with 2 that I like. This will be a long project and I'm not counting on it being finished before next year. I'm hoping to find fabric that will inspire me at the LQS.
This is a Rhapsody design I made last year that I colored in my paint program. This isn't the design I plan to make, but it's one of the better ones I came up with last year.

My DH encouraged me to sign up for classes at MQS this year. We live fairly close - about 2-3 hours away - and I missed it last year because I had to have thyroid surgery during the Showcase :( In fact, I've missed MQS the past several years due to either surgery or some other family events going on. I've signed up for classes for 4 days, leaving me plenty of time to see the quilts and shop :) I'm really looking forward to attending this year.
The "Flight at Sunrise" quilt is still waiting for borders. I'm going to dye some fabric next week to see if I can come up with something that will work.
Maybe one of these days I'll figure out how to finish one project before starting on another.
Susan

Sunday, January 11, 2009

Part 3 Wedding Gown Quilt

Another close-up of the quilting.
Another view of the top center of the quilt. This is after binding and reapplying the roses. I had to take the roses off while I quilted to keep the quilt flat and smooth.

This is the bottom of the quilt - the train of the wedding gown.


A full view - or as full a view as I could get - of the wedding gown quilt after binding. This was a long project but I think it turned out pretty well.


More Wedding Gown Quilt Photos

The above photo is of the back of the quilt. The silk is white in color.
Another close-up of the quilting on the front.

This is the center top of the quilt. The little filigree heart is in the midline with the feathers extending off on both sides.


Wedding Gown Quilt


Here it is! My photography isn't the best. I do wish I had a wall tall enough to hang the quilt and get a good photo, but I don't. This is a photo of the quilt before it was trimmed. It's laying on my bedroom floor on top of a couple of sheets.


This is a close-up view of the freehand Victorian feathers inbetween some of the lace, beading and sequins. The quilt is ivory satin with a silk backing.


This shows one of the filgree hearts I quilted in the upper right-hand corner of the quilt. I used a high loft polyester batting to get the faux-trapunto effect. The background is entirely McTavished.

Tuesday, January 6, 2009

Flight at Sunrise


This is my next personal project. I pieced this top last April, but didn't do anything further with it. I need to put some kind of border on it and then quilt it. Since I'm out of hand-dyed fabric, I think I'll take a day and dye fabric to see what I come up with. All the background patches are hand-dyed fabrics. The flying geese are commercial fabrics.
My oldest DD wants to make a whole cloth quilt out of hand-dyed fabric. We'll plan a day and dye fabric together and then she can design her whole cloth while I work on borders for this quilt. I'm also planning a whole cloth quilt, but out of white cotton sateen. It will be a while before I get to that one, though.
The wedding dress quilt is done as of 8:30pm tonight!!!!! I'm so happy! This was a long, challenging project, but I learned a lot and it sure is a pretty quilt. I want the customer to see it first before I post photos of it, but if she is agreeable, I'll get photos posted early next week.
My next customer quilt is a Sock Monkey quilt. Soooo cute!
Tomorrow I'm taking the day off from quilting. I have a lot to do around the house and I have yet to take down our Christmas decorations.
Susan