Posts

Hawaiian Quilt Progress and a Finished Double Wedding Ring Quilt

Image
The Hawaiian Quilt top is complete! This is a "big block" quilt pattern by Debbie Bowles. It went together quickly. I made 30 18 inch blocks set 5 x 6 then added a 3 inch outer border. The white fabric is a tone-on-tone that I purchased at a local fabric shop. The remaining fabrics were the ones I purchased in Oahu. The finished quilt size is 96 x 108 inches. I am playing around with quilting designs at this point in time. Hopefully I will get this quilt on the machine next week. In the meantime, I finished a Double Wedding Ring quilt. This was a large top that was given to me by a friend. Her mother had hand pieced this top. It was in good shape and almost perfectly square. I did a lot of ruler work on this top which slowed down the quilting process, but it was worth it.

Hawaiian Fabric Haul

Image
We returned from a trip to Hawaii two weeks ago. Before leaving the islands, I had to shop for Hawaiian print fabrics. I found Fabric Mart and spent almost 2 hours in this warehouse-style store shopping for fabrics. There were so many to choose from that I had trouble narrowing it down! With my husbands help I narrowed it down to 8 fabrics. The photo above shows 5 of them. The 3 bottom prints are Hawaiian prints, the top 2 are a hand-dyed and a batik. I chose the fabrics to coordinate together with the idea of making a quilt. Now to get the courage to cut into them! I am thinking a big block quilt and am looking at different patterns. I haven't decided on a design yet, but then I am in the middle of a different quilting project at the moment. A double wedding ring is on the machine.

Planners I Use for Organization

Image
Planners have been a part of my life for a very long time. When I was working in a management position planners were essential to keep me on track with all the meetings I had to attend and all the interviews I conducted. My life was very fast-paced and chaotic and the timed planner was what kept me sane! Last year with the cancer diagnosis and going through chemotherapy, I used my calendar in my phone to keep up with all the surgeries, treatments, labs, and doctor appointments. I needed the reminders the phone sent me to help me get to where I needed to be each day. This year things are much calmer and slower paced. I don't need a timed planner. I still used my phone to schedule appointments, but fortunately I don't have near as many as I did last year. This year I bought a Happy Planner to help me with my work and home life. Even though I am not as busy, I find that I have problems remembering things if I don't write them down. It's a side affect of the chemot...

Making Quilt Labels

Image
I recently published a video on my You Tube channel about making computer generated quilt labels similar to those pictured above. I am pretty diligent about labeling my quilts - now! I wasn't always. But I started to realized that with purchasing so many unfinished quilt tops that I didn't have a way to find the stories or the makers behind these quilts, that my quilts would be the same. So I now do my best to attach a label to each quilt I complete shortly after it is finished. Computer printed labels was a great time saver for me. If I don't have much information to put into a label, I can get 4 labels to a sheet of computer printer fabric. If I have a long story to put into a label, I can get 2 to a sheet. Sometimes I only have text on the label, but I am getting to where I add clipart to fancy it up a bit. With all the quilts that I own, it gets confusing at times as to the names of each one and when they were completed. With the labels attached, there isn't ...

Morning Glory Quilt

Image
After spending 6 weeks quilting the Cat's Cradle Quilt, I needed a fairly quick project just for fun. This Morning Glory quilt was the one I chose. It is a 1930s top with irregular edges. I bought this top about 3 years ago at a flea market. It was on display outdoors tossed over the back of a chair and it had been raining the night before. Half of the quilt was dragging in a mud puddle. I purchased the top, took it home and washed and dried it and put it in storage. I have some plastic storage boxes that I store my quilt projects in until they are completed. The quilting is simple on this quilt. It is continuous curve around the rectangles and triangles that make up the circles of the blocks, and straight line quilting in the hexagons. It took some work to figure out a path for continuous quilting, but once I figured it out, the quilting went fairly quickly. The binding that I originally thought would be a huge undertaking was actually not a problem at all. I cut the bin...

Completed Cat's Cradle Quilt

Image
It took quite some time, but I finally finished the Cat's Cradle Quilt. I like how replacing the borders made such a difference in the quilt. It was one that would have been completely disassembled and remade with only the pieced blocks if I hadn't experimented on ways to keep this quilt intact as much as possible and still have been able to quilt it. The Grunge fabric for the outer border was a near perfect replacement for the original fabric. I don't think I could have gotten any closer to the original color. This is one quilt I will be keeping. When I put as much time and energy into a quilt as I did this one, I cherish it. Here is one of the videos I posted on You Tube about this quilt. Check out my channel to see more quilting videos at Sunrise Quilt Studio

Finding Extra Time to Quilt

Image
I had an unexpected day off from my day job on Thursday so, I decided to spend it quilting. The Cat's Cradle quilt is still on my longarm machine and I really needed some extra hours to spend quilting it. I spent about 30 minutes cleaning out a bookcase of old quilting magazines that I hadn't looked at in over a year. Then on to the Cat's Cradle quilt. The outer border was still not completed, so I focused on that. I had to redraw the design on the lower portion of the border because I had missed my target points in a large section of the design and the cross-hatching would have been way off if I didn't fix it. That took over an hour to redrawn the design. Then it was break time. A cup of coffee, lunch, and time spent with my daughter and our dog made the 90 minute break go by fast. Another 2 hours of quilting and the border was done. This is one border design that I won't do for some time. It is soooo time consuming! It's beautiful, but time consuming. ...

Cat's Cradle Quilt and Future Plans

Image
I have been working on this vintage Cat's Cradle quilt top for several weeks now. When I purchased it I didn't realize how badly out of square it was. Most vintage tops are not square, so I was expecting an issue with squaring up the top, but not to the extent that this top was. Above is the "after" picture. After I spent hours desperately trying to quilt this top "as is" and making it square in the quilting process. I finally gave up and decided it needed to be deconstructed in order to be saved. Luckily, I only had to remove the borders to get it back to square. It is my opinion that this top was left to hang somewhere for years after it was made! Maybe on a hanger, but most likely the center of the quilt was pulled through a decorative hanger and mounted on a wall as a decoration. The reason I think this is because the center of the quilt is faded and it measured 10 inches wider and longer through the middle of the quilt than the edges at it's...

Designing Quilting for a Maple Star Block

Image
The Maple Star Block is the 2nd block in the block of the month quilt I am currently working on. Click on the video below to see a video of different quilting design ideas for this block.

Quilting the Red Basket Quilt

Image
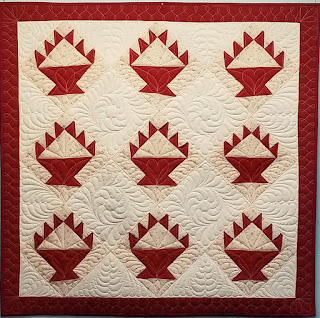
My goal for the red basket quilt was to have it completed by Christmas. I am happy to say that I reached that goal. I decided to combine traditional and contemporary quilting designs in this quilt. I wanted a traditional feel overall, but wanted the convenience of contemporary quilting. I chose to quilt feathers in the alternate blocks and the setting triangles. The alternate blocks have a traditional feather wreath and the setting triangles and corner triangles have a feather filler with a more contemporary feel. For the pieced blocks, I chose to use continuous curve designs for the majority of the block. I did quilt some radiating lines in the section between the "handles" and the base of the basket. Feathers were added to the outside rectangles. The border was quilting with a herringbone pattern. The thread I used was an off-white machine quilting thread by Coats & Clark. This thread is 100% cotton and runs really well in my machine. To see a video of how ...

1920's Red Basket Quilt

Image
This quilt started as 9 machine pieced basket quilts dated from the 1920s. I purchased the blocks from an antique store. I put them together with some white cotton fabric as alternate blocks, and black on red fabric for the border. The blocks are machine pieced and not done with precision. Many of the points were cut off before I squared up the blocks. The blocks were also various sizes from 8" to 9" and not many were square. I pieced the top using my vintage Singer 15-91. The machine sewed beautifully, but, the top turned out to be out of square. So I measured the blocks from corner to corner instead of side to side and found 2 blocks to switch around to make the rows more consistent in length. That squared up the quilt. So, lesson learned - measure the top through the middle and the edges to see if it is truly square. Also measure the blocks on the edges as well as through the middle both ways to see if they are completely square. You can view the video I made the o...

Bethlehem Star Quilt

Image
I finished quilting the 1930's Bethlehem Star quilt last week, and am very happy with the way it turned out. The quilt is 65 x 65 inches square. The outer border is quilted with piano keys and the inner border with a freehand flower. I used an 80/20 batting and 100% cotton thread from Signature in white. The background is quilted in a whimsical feather design using a mix of formal feathers and a feather with a curl. The feathers change direction within the large block which adds a lot of movement to the quilting. I chose to quilt the section where 4 blocks come together and treat it like I would an alternate block. The stars are quilted with a continuous curve design. Below is a video I posted on YouTube about the quilting.

Turn of the Century Sampler Quilt

Image
The quilt above is made from turn of the century quilt blocks that belong to my mother-in-law and were made by her grandmother. She had asked me some time ago to put them into a quilt for her, but I couldn't find fabrics that would complement the blocks until just recently.  The border, sashing and cornerstones are reproduction fabrics from Moda. The block above is called Four Crowns. This one is made from cotton fabrics. However, the other blocks with this pattern are made from flannel as well as cotton. The pinwheel block above is a 13 inch block. The other blocks were 15 inches. So to make up the difference, I added a 1 inch border using the blue reproduction fabric to make it the same size as the other blocks. Most of the quilting is all straight line quilting expect for these blocks. I used 2 of my circle rulers to make the design in the pinwheel. This Virginia Reel block was quilted using 1/4 inch outline quilting to emphasize movement in this block....

Quilting the Spiderweb Quilt

Image
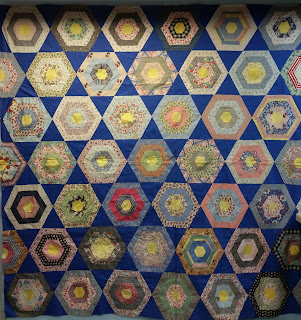
The quilting is complete on the hexagon quilt! I did more research on this pattern and found that it is a "Spiderweb" block. The fabrics are 1930s for the most part. I can't date the solid blue star point fabric and a few of the other fabrics in the quilt, but for the most part they are 1930s. I decided on an egg and dart quilting design for the spider webs with a flower in the center - then a continuous curve design for the star points. My main goal was to find a design that emphasized the spiderweb design and that the star point design be symmetrical. A directional design in the star points would have caused a lot of extra work to get them to look right since they are connecting 3 different spiderweb blocks together. Here is a video of the quilting:

Vintage Hexagon Quilt

Image
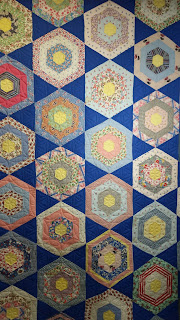
We took last Saturday off from working around the house to visit an antique mall that we hadn't been to before. I came home with this quilt top! Dating it isn't straight forward, but it does have a lot of 1930's fabrics in it, and possibly some 1920's. The solid blue triangles I am not able to date. The quilt is hand pieced and doesn't use a foundation fabric. Luckily for me it is fairly square. I currently have this top on my quilting machine waiting to be quilted. Hopefully I will get to it later next week when I'm over the worst of this cold. I posted a You Tube video of some designs I tried out using a piece of tablecloth plastic as an overlay on the top and a dry erase marker. You can view the video below.

Vintage Dresden Plate Quilt

Image
This 1930's Dresden Plate quilt is a re-work. I purchased the quilt at an antique shop a year or so ago. It was tied in the center of the plates with crochet cotton, and machine stitched in the ditch around the blocks. The binding was frayed and the backing was full of holes. So I took it apart, gave it a new backing and quilted it using an 80/20 batting. The plates are quite faded, and it was obviously used. As I worked with this quilt I realized that the sashing was not 100% cotton fabric - it is a poly-cotton blend. It is possible that this isn't the first time this quilt has been reworked. Perhaps the blocks were sewn into a different setting and someone took it apart and added the sashing. Or perhaps the blocks were stored away for years and taken out and set in with the poly-cotton sashing back in the 60's or 70's or 80's. It would be interesting to know the true story of this quilt. The quilting I did leans towards traditional quilting with ...

Characteristics of a Vintage Quilt

Image
I've posted a short video on my You Tube channel showing some interesting characteristics of a vintage LeMoyne Star quilt that I am currently working on.

Blue Tigers 2

Image
Blue Tigers 2 is a replication of "Blue Tigers"(below) that I completed a few years ago. I had sold Blue Tigers and my daughters were not happy that I had sold a quilt of their cat, so I promised to replicate it. Unfortunately it took me a couple of years to get it completed. It isn't an exact replication - there are several difference. The fabrics are different for one. The blues are more turquoise and all the other fabrics are different except for the background. I had a leftover piece large enough to used for the quilt, I didn't add a border, and instead of hand-beading the quilt I used hot-fix crystals. The border is also a solid black fabric instead of a purple batik. The quilting is also different, especially the background and the leaves in the flowers. All in all I am happy with the way both quilts have turned out.

Completed 1930's Butterfly Quilt

Image
The 1930's Butterfly Quilt is finally complete including the binding. I used a 30's reproduction fabric for the binding and attached it to the front of the quilt using the longarm machine. I have a video on my YouTube channel that shows the process. Click here for the video: Binding . There is also a video on the background quilting on the same page. Hope you enjoy them.

1930's Butterfly Quilt

Image
I purchased this quilt top in 2014 at an antique shop in Warrenton, MO. A lot of the embroidery was not completed, so I hand stitched that over a few days time. A few weeks ago, I took it out and looked it over. It had a lot of stains on it and was just dirty overall. So with some advice from the local quilt shop owner I purchased some quilt wash and soaked the top overnight. It took out all the dirt and most of the stains. I dried it in my dryer set to air dry - no heat. My main concern was that the edges of the appliques might ravel with washing, and they did just a little bit, but nothing too seriously. They had been machine stitched down close to the raw edges by the maker, then hand embroidered with a blanket stitch. That helped keep the edges from raveling to the point of no return. The quilting was kept pretty simple. Here is a short video of the quilting in the butterfly appliques.