Posts

Showing posts from June, 2009

New Postcards & Importance of Blocking

Image
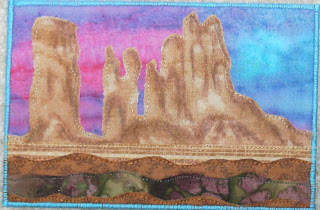
Here are a few of the postcards I have been experimenting with lately. They are all a small "window" snapshot of another larger drawing from a Dover copywrite free coloring book. I made a window in a piece of cardstock and moved the window around the coloring book page until I found an image that appealed to me. Then I traced the image onto tracing paper, scanned it, enlarged it to 4.5x6.5" and then traced the enlargement onto white muslin with a pigma pen after I had applied fusible web to the back of the muslin. The fusible web made the muslin stable enough to draw on. The entire piece is fused to Peltex. The color is all from colored pencil. I brushed textile medium over the color and let it dry, then added thread painting on a few of them. Then I applied a piece of muslin to the back of the card using fusible web, trimmed the card to 4x6" and finished the edges with a satin stitch. I'll post a few more in the future. The Importance of Blocking a Quilt I w

Postcards for Carma House

Image
The Learning Fiber Arts group is making and sending fabric postcards to Shirley the list owner to be donated to Carma House. Shirley has been donating her art quilts to Carma House and now her own family is in need of the facilities services. As a show of support to Shirley, we are donating the postcards which Carma House will sell to help support their work. The postcards are blank - no writing on the back except for a small notation of the name of the card and the maker - so that people who purchase the cards can send them in the mail with their own messages. That means we send them to Shirley through the post in an envelope. Pop on over to Shirley's blog for more details, and if you're interested make a fabric postcard and send it to Shirley to help support Carma House. I have donated "Monument Valley" above. It is fabric and colored pencil treated with textile medium and uses Peltex for the base of the card.

Hand Embroidered Quilt

Image
This well-loved quilt was hand embroidered and hand quilted by my Aunt Georgia back in the 1970's. She made one for each of her nieces and nephews which numbered 11! She was always doing some kind of needleart work in her spare time from quilting, embroidering, or crocheting. She bought this pre-printed top either at a Ben Franklin store or ordered it through a catalog and embroidered it then quilted it using a large hoop on a stand. My daughters still use this quilt. The binding is frayed and some of the quilting has worn away, but the embroidery is still secure and vibrant in color. Thinking back, I have only 2 blood relatives who quilted - my Aunt Georgia who is my mother's oldest sister and my father's mother. Both have passed on, but I have pieces of their work to remember them by.

Blocking a Quilt

Image
Feather Starburst is rinsed, blocked, and ready to trim square for binding. Then the color will be added. I took photos as I blocked the quilt for a little tutorial. Here are the tools I used for blocking. I have an old quilt laying on my carpeted floor covered with a sheet. I also need a bunch of pens - I'm estimating that I used about 40-50 pins on each side of this quilt, and it's 29" square. The pins I use are the corsage pins that I use for pinning quilts to the leaders of my longarm machine. You can use whatever pins you have that are rust-proof. I also have a long tape measure, a square ruler and a 6" x 24" ruler I rinsed the quilt in my washing machine using only the rinse cycle. This gets out the blue water-soluble pen and spins out much of the water so it isn't dripping wet when I block it. I start blocking by placing 4-5 pins in the center of one edge of the quilt and working out, using the long 24" ruler as a guide to make sure I'm pinnin

Feather Starburst

Image
Saturday afternoon I decided to put this little wholecloth on the machine to get it ready to quilt Sunday afternoon. With it being Sunday and Father's Day my time was limited in regards to quilting, but I did manage to get the design quilted and I've started the background filler. I should be done later today. Once I take Feather Starburst off the machine, it will be soaked in water to remove the blue markings, then blocked to dry. Then it will be time for fun - coloring it with colored pencils! This is a faux trapunto piece. I have 2 layers of batting, a Soft and Bright on the bottom with a 6.6oz poly on top.

Vintage Quilts

Image
I love contemporary quilts and art quilts, but I have a soft spot in my heart for traditional patterns and vintage blocks, tops and quilts. Whenever I have the chance to rummage through a flea market or antique, you can bet I'm looking for some old blocks someone has stuffed into a baggie in a corner of a booth. This past April I made 2 great finds at antique shops. This is a Cactus Basket quilt that is a 3 generation quilt. The blocks where hand pieced by my paternal grandmother who died in 1960. The fabrics look like mostly 1940's with a few 1930's fabrics mixed in with them. We don't know when Grandma pieced the blocks, but we know they were done before 1960. My grandfather held on to these blocks and they were given to his youngest son's wife upon Grandpa's death, she being the only quilter in the family at the time. A few years ago, Aunt Jerri finished piecing the top and handed it over to me to quilt on my Gammill. I quilted it with traditional patterns

Color Wheel

Image
Value and Color is the next set of lessons. This is a color wheel made from fabric as well as a gray-scale value run and a black and white scale value run. This tool isn't finished. I am still looking for 2 colors for the color wheel, and I need to tweak the gray-scale and black/white scale a bit. They look fine close up, but from a distance they aren't in the best order for a value run. I need solid gray fabrics for the gray-scale - I didn't realize how hard it would be to find solid gray fabric in 7 shades! Three of the black and white prints are too close to the same value. I need to change at least 2 of these fabrics. I have received a few comments about the white background on my compositions and thought I would explain a bit more about why I'm using white. First it's because that is what the instructions say to use - I don't always follow the directions to the letter, but this time I did ;) Secondly the reason the author gives for the black on white comp

Composing With Color

Image
The next lesson is to compose with colored shapes cut into rectangles of all the same color. There is one 4x4 square, one 1x4 rectange, three 2x2 squares and three 1x1 squares. I chose to use a diagonal setting using purple. Next is a composition using the same sizes of rectangles but including one 2x2" square of a contrasting color. This is to see if the contrasting color and position of the contrasting color adds or detracts from the composition. This one doesn't work for me. I'll try again later.

Continuing Education

Image
Being a quilter, I'm always interested in trying new quilting techniques so I buy lots of books on quilting design, quilting patterns, quilting history, etc. After attending classes at MQS last month and viewing all the beautiful quilts in the show, I decided to improve on color usage in my own quilts - this coming from a quilter who seems to be concentrating on white wholecloth quilts! What can I say - I like variety! I purchased Katie Pasquini Masopust's book "Color and Composition for the Creative Quilter". I'm slowly working through the lessons and having a blast! These first lessons are quick and are easy to do on my "day off" from quilting for customers. Here are photos of a lesson on composing with line and shape. They are all 8 1/2 x 11" compositions using black fused fabric on white muslin. The first photo is using line placed parallel to the edges of the white fabric. This is using line in a diagonal composition. Another line composition

Zipper Leader Tutorial - Part 4

Image
Next you'll make the zipper leader for your "Lining Roller" canvas. Follow the same steps with one exception. Position your closed zipper face up with the tab to the right as before, but you will be positioning the canvas above the zipper instead of below it. Hopefully you can see the difference in the photo below where I have already attached the new zipper canvas to the Lining Roller Canvas. If you chose to make zipper leaders for your quilt top roller also, you will use the same steps as the "Lining Roller" canvas above. To make extra sets of zipper leaders, position the closed zipper face up with the tab to the right. Stitch a new canvas to both sides of the zipper along the 1/2" folded edge of the canvas. Stitch them on your domestic machine as before using a zipper foot starting at the center and stitching to the ends. Label the top canvas "Lining Roller" or "Quilt Top Roller" and the bottom canvas as "Pick Up Roller". Th

Zipper Leader Tutorial - Part 3

Image
Now we're ready to attach the zipper to the canvas leader on the machine. This is for the "Pick Up Roller". Step 1: Extend the Pick Up Roller leader and clamp the sides to stabilize it. Step 2. Match the center of the zipper to the center mark on your Pick Up roller Leader and pin in place. I used only one pin to get me started, but if you feel more secure by adding pins along the length of the zipper, do so. Step 3. Stitch from the center to the right using your longarm. Keep the hopping foot close to the edge of the canvas to give yourself a 1/4" seam allowance. If you have a stitch regulator option on your machine, this is a good place to use it. I don't have that option on my machine so I set the dial to 15 and stitched slowly along the canvas guiding the zipper as needed by hand. Once you are to the end of the zipper, backstitch to secure. Here is the new zipper leader stitched to the Pick Up Roller leader. You'll notice that the new leader is about 6&qu

Zipper Leader Tutorial - Part 2

Image
You are now ready to attach the zipper to your leader using your domestic sewing machine. You have to decide which way you want your zipper to lay - with the closed tab to the right of your machine or to the left. I chose to have the tab to the right side of my machine as I'm standing on the free-hand size. This first zipper leader is for the "Take Up Roller" leader on your machine. The directions are for the closed pull tab to be on the right side. Step 1. Start with the closed zipper facing right side up and the tab to the right. The canvas is also right side up. Match the center mark of your closed zipper to the center mark on the leader with the 1/2" fold. The fold of the canvas is positioned right up against the zipper teeth. The closed tab is positioned on the right side. Pin in place. . Step 2. Start stitching the canvas at the center mark. Use a zipper foot and a straight stitch on your domestic sewing machine. I used a 3.0 stitch width. Stitch to the end of

Zipper Leader Tutorial - Part 1

Image
I removed my old zippers yesterday and completed attaching my new zippers. Along the way I made 2 additional sets of zipper leaders so I have the ability to have 3 quilts ready to zip on if I need to. As promised, I took photos of the steps and will post them in stages. These directions are my own and you may be able to find other instructions out the internet. This is something I came up with on trial and error. The first set of zipper leaders I made were with garment zipper that you buy by the yard at a fabric store. They didn't work out the way I wanted. They kept separating on their own. So now I have 8 yards of zipper to use in other projects. First off you'll need some materials and supplies. 1. Canvas Duck - I purchased 4 yards of 60" wide canvas so I wouldn't have to seam the leaders. This is enough to make 5 sets of 2 leaders. Buy the length to match the length of your zippers. 2. Separating Zippers in the size of your choice - I purchased 144" long zippe

Wiggles and Giggles

Image
I got the name of the quilt wrong in the previous post. It's "Wiggles and Giggles" and is found in a "Country Woman" magazine from earlier this year. I think it turned out really cute. The faces on the worms are drawn on with fabric markers. The instructions said to applique the faces on, but I cut 2 pieces of each and sewed them right-sides together, turned them rightside out and stitched them into the seam.

Wiggle Worm

Image
These fabrics are for a customer quilt called "Wiggle Worm". It's a child's quilt made with bright, novelty fabrics. It is really cute in the photo and I'm looking forward to seeing how this one comes out. I couldn't find the same fabrics the designer used so I substituted as best I could. My schedule says this quilt needs to be completed by Monday, so I had better get to work!

More Info on Wholecloth Design

Image
From some of the comments I received from my last post, I thought it would help to add a bit more information about wholecloth design. I am not an expert in this area and there are lots of different ways to execute a wholecloth, but I can tell you what works for me. First off, this is another link to Irena's site. Hopefully this one will work. I had copied and pasted the url from her site yesterday and for some reason it isn't working. This link is the url that is listed in her book "Start With a Blank Slate". It's a bit different but gets you to the same place. To see her books, click on "books" on the left sidebar under "Products", then scroll down the page until you see the book you want o see. I use Mark B Gone water-soluble pens by Dritz to mark my wholecloth quilts. They are readily available at discount and fabric stores as well as local quilt shops. They also wash out easily which I really like. The designs are almost always drawn or

New Wholecloth Design

Image
This little quilt top doesn't have a title yet. It's about 27 inches square using a very fine, smooth Robert Kaufmann muslin. All the designs are from Irena Bluhm's book " Start With a Blank Slate". I'm making this quilt to play around with colored pencils. It will be a couple of weeks before I get around to quilting it and even longer before the coloring is completed. I have to finish several customer quilts first.

National Star Completed

Image
National Star is completed and home with it's owner. Here are a few photos I took after I finished binding the quilt. The photo above shows as much of a full view as I could get into the camera frame. This was a large quilt, too large to hang on any of my walls to photograph. There was lots of cross-hatch quilting on this pre-printed wholecloth. Some of it was on the diagonal and some on the straight of grain. It's hard to tell from the front fo the quilt, but there are grape clusters pre-printed on the wholecloth. The customer requested that I substitute my Victorian heart instead. The photo above is the back of the quilt! You can see the Victorian hearts better here. This is a reversible quilt now, with one side being white, the other being redwork in reverse! More Victorian hearts. McTavishing background filler was used along with a tiny stipple to bring out the faux trapunto. I used Soft and Bright batting along with 6.6oz poly batting for the trapunto. The thread is S