Zipper Leader Tutorial - Part 1
I removed my old zippers yesterday and completed attaching my new zippers. Along the way I made 2 additional sets of zipper leaders so I have the ability to have 3 quilts ready to zip on if I need to.
As promised, I took photos of the steps and will post them in stages. These directions are my own and you may be able to find other instructions out the internet. This is something I came up with on trial and error.
The first set of zipper leaders I made were with garment zipper that you buy by the yard at a fabric store. They didn't work out the way I wanted. They kept separating on their own. So now I have 8 yards of zipper to use in other projects.
First off you'll need some materials and supplies.
1. Canvas Duck - I purchased 4 yards of 60" wide canvas so I wouldn't have to seam the leaders. This is enough to make 5 sets of 2 leaders. Buy the length to match the length of your zippers.
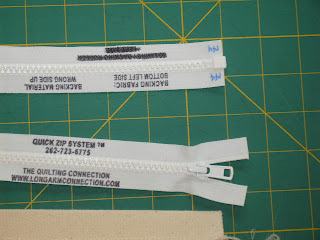
2. Separating Zippers in the size of your choice - I purchased 144" long zippers from The Quilting Connection while I was at MQS last month. I purchased 4 of them. You can purchase the entire set that includes their directions at http://www.longarmconnection.com or do an internet search for separating zippers and see if you can find a place that sells them locally or on-line. I've heard other quilters use sleeping bag zippers and others who use hook & loop tape instead of zippers.
3. Rotary cutter, ruler and mat.
4. Seam Gauge or other small ruler - to measure the folded edges of the canvas.
5. Domestic Sewing Machine and a sturdy needle. I used a size 11 universal needle. I used All Purpose thread.
6. Serger is optional. If you don't have a Serger, use the zigzag stitch on your domestic machine.
7. Pins - I used corsage pins
8. Your longarm threaded with matching thread - I used cotton 40 wt., and a size 4.0MR needle.
Step 1.
Using your rotary cutter, mat and ruler, cut your canvas duck 6" wide by the length of the fabric - in my case it was 144" long to match my zippers
 Step 2. Serge or zigzag all 4 edges of the new leaders. Fold up one long edge 1" and press. Fold up the opposite long edge of the leader 1/2" and press.

As promised, I took photos of the steps and will post them in stages. These directions are my own and you may be able to find other instructions out the internet. This is something I came up with on trial and error.
The first set of zipper leaders I made were with garment zipper that you buy by the yard at a fabric store. They didn't work out the way I wanted. They kept separating on their own. So now I have 8 yards of zipper to use in other projects.
First off you'll need some materials and supplies.
1. Canvas Duck - I purchased 4 yards of 60" wide canvas so I wouldn't have to seam the leaders. This is enough to make 5 sets of 2 leaders. Buy the length to match the length of your zippers.
2. Separating Zippers in the size of your choice - I purchased 144" long zippers from The Quilting Connection while I was at MQS last month. I purchased 4 of them. You can purchase the entire set that includes their directions at http://www.longarmconnection.com or do an internet search for separating zippers and see if you can find a place that sells them locally or on-line. I've heard other quilters use sleeping bag zippers and others who use hook & loop tape instead of zippers.
3. Rotary cutter, ruler and mat.
4. Seam Gauge or other small ruler - to measure the folded edges of the canvas.
5. Domestic Sewing Machine and a sturdy needle. I used a size 11 universal needle. I used All Purpose thread.
6. Serger is optional. If you don't have a Serger, use the zigzag stitch on your domestic machine.
7. Pins - I used corsage pins
8. Your longarm threaded with matching thread - I used cotton 40 wt., and a size 4.0MR needle.
Step 1.
Using your rotary cutter, mat and ruler, cut your canvas duck 6" wide by the length of the fabric - in my case it was 144" long to match my zippers
 Step 2. Serge or zigzag all 4 edges of the new leaders. Fold up one long edge 1" and press. Fold up the opposite long edge of the leader 1/2" and press.
Step 3. Stitch the 1" folded edge close to the serged edge with your domestic machine. This is the edge where you will pin or baste your quilt top or backing fabric.

Step 4. Mark the center of the leader on the right side near both long edges with a pen. I used a fabric marker. You can use a Sharpie pen, or an air-soluble marker if you don't want the mark to be permanent just yet.

Step 6. Mark the center of your zipper on both long edges.


Step 4. Mark the center of the leader on the right side near both long edges with a pen. I used a fabric marker. You can use a Sharpie pen, or an air-soluble marker if you don't want the mark to be permanent just yet.

Step 6. Mark the center of your zipper on both long edges.


Comments