The theme for the postcard exchange on Valerie Hearder's Yahoo Groups is "Christmas". We decided that the postcards didn't have to be a landscape this time around. Cardinals always remind me of Christmas.
Your card is beautiful. Someone will be receiving a unique card. Betty
Anonymous said…
Oh my .. your card is lovely. It reminds me of a dearly departed old bf that passed away on this date in 2001. We lived in MA, at his parents home we would sit at the dining room table and watch the cardinals at the bird feeders out in the yard.
When he passed away, my mother (who lives in North Eastern Ontario) had a red cardinal at her bird feeder ... had never had one before or after.
Thank you .. this has put a smile on my face during a very sad day for me.
Hugs, if you want one, Julie Andrea sundayschild1966ATyahooDOTcom
Planners have been a part of my life for a very long time. When I was working in a management position planners were essential to keep me on track with all the meetings I had to attend and all the interviews I conducted. My life was very fast-paced and chaotic and the timed planner was what kept me sane! Last year with the cancer diagnosis and going through chemotherapy, I used my calendar in my phone to keep up with all the surgeries, treatments, labs, and doctor appointments. I needed the reminders the phone sent me to help me get to where I needed to be each day. This year things are much calmer and slower paced. I don't need a timed planner. I still used my phone to schedule appointments, but fortunately I don't have near as many as I did last year. This year I bought a Happy Planner to help me with my work and home life. Even though I am not as busy, I find that I have problems remembering things if I don't write them down. It's a side affect of the chemot...
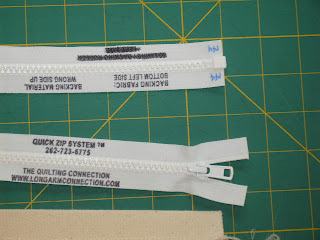
I removed my old zippers yesterday and completed attaching my new zippers. Along the way I made 2 additional sets of zipper leaders so I have the ability to have 3 quilts ready to zip on if I need to. As promised, I took photos of the steps and will post them in stages. These directions are my own and you may be able to find other instructions out the internet. This is something I came up with on trial and error. The first set of zipper leaders I made were with garment zipper that you buy by the yard at a fabric store. They didn't work out the way I wanted. They kept separating on their own. So now I have 8 yards of zipper to use in other projects. First off you'll need some materials and supplies. 1. Canvas Duck - I purchased 4 yards of 60" wide canvas so I wouldn't have to seam the leaders. This is enough to make 5 sets of 2 leaders. Buy the length to match the length of your zippers. 2. Separating Zippers in the size of your choice - I purchased 144" long zippe...
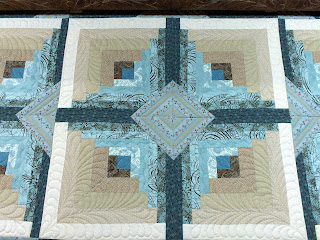
I don't know the title of this quilt, but it is a Log Cabin Variation that I just completed for a customer. I love the soft blues and browns in this quilt. It just begged for feathers. See what I mean? I did add a few leaves in the small border, though.


Comments
Susan
Betty
When he passed away, my mother (who lives in North Eastern Ontario) had a red cardinal at her bird feeder ... had never had one before or after.
Thank you .. this has put a smile on my face during a very sad day for me.
Hugs, if you want one,
Julie Andrea
sundayschild1966ATyahooDOTcom