Posts

Showing posts from 2008

Happy New Year!

Image
Wishing all of you in "Blog Land" a very Happy New Year! Thanks to all of you who blog and share your talent in the cyber world. I am for one have been inspired by each of you to try new techniques and new forms of art. Thanks again for your generousity. Susan

McTavishing

Image
I made this quilt a few years ago when I was working on my Filigree patterns. This little quilt is trapuntoed with a 6.6oz batting and a Soft and Bright main batting. The background is McTavishing. This is one of the quilts I use as a sample for my customers who want McTavishing in their quilts. I took time out from quilting to spend time with family at Christmas. Even though we were all here at home and we didn't do any traveling, we had a nice day here. We are used to traveling or visiting relatives on Christmas day. Our son came and spent several days with us, so it was a nice week. My oldest DD helped me with cooking. That's quite a feat since she doesn't like to cook ;) She made a batch of chocolate chip cookies one day, and on Christmas Eve she helped with the entire meal. I had precooked a turkey the day before so we had only the trimmings to fix. Mashed potatoes, rolls, lemon and basil carrots, scalloped mushrooms, etc. All my families favorites. Christmas morni...

Fit to be Tied

Working on a show quilt takes time. I know that, but everytime I start one I realize how much time they actually take. It seems I have memory lapse from one show quilt to the next. The excitement of the challenge takes priority in my brain. Today I finally finished tying and burying all the stops and starts on the feather stems and outline quilting. I timed myself at one point and the results are:....... 5 minutes to quilt = 25 minutes to tie off and bury thread tails! Of course these are meandering feathers and I had to stop and start the stems at various places. Normally I don't have that many stops and starts in a quilt. This is also a very large quilt - king-sized plus! Today I'm working on the feathers and hope to get to some of the background quilting. I hope to have the quilting done by this weekend so I can work on the binding. With Christmas just 2 days away, this may be wishful thinking :) Susan Susan

Comparisons

Image
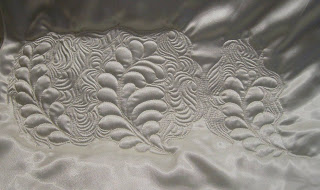
In working on this wholecloth quilt, I did a couple of comparison quilting samples with different types of batting before deciding on which combination to use. I want a trapunto look, but since I can't get this quilt wet due to the type of fabric as well as the beading, lace and sequins already on the quilt, I'm going for faux trapunto. The photo above shows feathers quilted with 3 different combinations of batting. These were quickly quilted freehand with McTavishing background filler. The top fabric is bridal satin with a silk backing fabric. I've used Sew Fine 50wt. thread in the top and bobbin. I had my DH and oldest DD give me their votes. I'll reveal my decision and the batting combination I've chosen in a future post. Which do you like best? Susan

Golden Paper

Christine asked me what Golden Paper was that I had mentioned in a previous post. The correct name is Golden Threads Quilting Paper . It's made by Golden Threads . You can purchase it from their website here or from other quilting suppliers like Kingsmen . It comes in 3 different widths. You use it by tracing your design onto the Golden Threads Quilting Paper with a water soluble marker. You can then place your design on your quilt top and pin it in place and quilt through the paper onto your quilt top. Or you can punch it by stitching through the paper on your design with your sewing machine (unthreaded) to make a stencil. You then use a chalk pounce pad to mark your design onto your quilt top. The paper comes with instructions on how to use it. I've used both methods and they both work well. With the whole cloth that I'm working on now, I'll use the method where I quilt through the paper directly onto the quilt. I pin it in place and quilt just as if I've marked...

Tools of the Trade

Image
I spent the majority of yesterday working on designs for the satin wedding gown quilt. I have so many ideas running through my head on what designs to use on this quilt that I haven't come to a conclusion at this point. This photo shows some of the tools I've been using to design quilting patterns. I drew that feathered heart design so many times that I can't remember how many times I erased and redrafted it. The feathered heart itself came together quickly since it's a pattern I quilt freehand quite often - it was the layout that I couldn't decide on. At this point it is drafted to set on-point with a slightly curved outline surrounding the hearts and then a feathered filigree design I drafted earlier in the same day. I also drafted 2 more blocks of the filigree feather in 2 different sizes as another possible design for the quilt. Most of the tools I use are familiar to quilters: paper - tracing, printer paper, and large sheets of plain paper: pencil, black shar...

Wholecloth Quilts

Image
This photo is of a wholecloth quilt that I made for an auction to raise funds for the Missouri Baptist Children's home back in 2004 or 2005. I can't seem to remember which year. It's white cotton with cut-away trapunto. I used Warm and White as a main batting and 6.6oz poly batting for the trapunto batt. The background fillers are micro-stippling, McTavishing and rays. I thought I would post a few photos of the quilt since my mind has been pre-occupied with wholecloth quilting designs the past week. The quilting designs in this quilt are from Anita Shackleford's Infinite Feathers Quilting Designs book as well as from Pepper Cory and Karen McTavish. Of course there are some timeless ropes in there, too. The wholecloth I'm working on now is a satin wedding gown redesigned into a quilt top. It's absolutely gorgeous with the ivory satin, lace, pearls and sequins. I'm very excited and honored to be working on this quilt. This week has been spent pouring over eve...

Finished Quilts

Image
I finally got my daughters gathered up and wrapped up in heavy coats and we made our trip to run errands. I stopped by the fabric store to buy small pieces of silk and satin to practice quilting new feather designs for the wholecloth quilt. I'll bind the practice pieces and use them as samples once they are done. We arrived home just in time. The back deck was covered with ice from where the rain water had frozen. It won't be long and the roads will be icy, too. Here is a photo of the completed Dick and Jane quilt. It's all quilted and bound and ready for wrapping up for Christmas. This photo shows the back of the Dick and Jane quilt detailing the quilting. I used Mary Covey's Apple design. This is the finished Mystery Quilt. I have to decide on a name for this quilt. It gives me the impression of lattice work. Any suggestions? My customer's embroidered snowmen quilt is also done and ready to go home to it's owner. It's been a productive week. Now back t...

Preparing for Winter

Image
Preparing for winter in our new home in central Missouri is completely different from when we lived in the country. We used to cut and stack wood for supplemental heating - something necessary when you live in an area where electricity is unreliable in summertime much less in winter. We lived near the Arkansas border and ice storms were usually more common than snowstorms. Ice storms mean ice-laden limbs that fall out of trees and knock down power lines. Which in turn can equal days on end without electricity or heat or water for that matter. We had well water so when you don't have electricity, the well pump doesn't work. We have been snowed in for as long as a week with snow storms that dump 8-12 inches of snow on our 1/4 mile long hilly driveway. There was only one way in and out of the property and if you tried to drive down the driveway and slipped off, you would end up in the pond! Not a great prospect and not worth risking. We kept the freezer stocked as well as the pant...

Ornaments, etc.

Image
I've been busy crocheting in the evenings to finish a couple of projects. The photo above is a crocheted dishcloth. It is one of several that I have completed over the past month. I'll use a couple of them as "White Elephant" gifts at our Sunday School Christmas party next week. Here is a close-up of a few of the crocheted snowflake ornaments that I've also been working on. I soaked them in heavy spray starch and pinned them to a piece of cardboard covered in plastic wrap and freezer paper to dry. Today they will be ready to attach a hanging cord to and hung up on the tree. This photo shows the entire set that I have crocheted these past weeks. I finished piece the quilt top for Debby's Snowman quilt yesterday and today I'll be loading it on the machine and start quilting. Once that is done I still need to get my son's quilt on the machine and quilt it. I'll do an overall design on that quilt. It's a tesselating star quilt. I made this qui...

Christmas Rush

I hope everyone survived Black Friday this year. With the news coming in about shootings and tramplings, I'm glad I stayed home! I have only gone out once on the Friday after Thanksgiving to shop, and realized it wasn't my thing. That said, I did go out Saturday and made a huge dent in my shopping. I'm also making several gifts this year so I've been spending lots of my spare time (whats that?) working on them. I have 2 quilts waiting for binding and another needed to be quilted and bound. I made a small purse for my youngest DD and plan on one for my oldest DD. I have also crocheted dishcloths for a White Elephant gift for our Sunday School class. I love using them myself so if I had received them as a gift I would be thrilled, but I don't imagine everyone else feels the same - especially the men ;) Then there are the 2 dozen snowflake ornaments that I have crocheted for our Christmas tree. I still need to starch them, though. Hopefully I'll get to that tomorro...

Mystery Quilt Completed

Image
Here is a photo of a section of the Mystery Quilt with the freehand feathers completed. And here is a photo of the entire quilt with the quilting completed and ready for binding.

Freehand Feathers Tutorial

Image
I was working on a Mystery Quilt top that I had completed last winter, and decided to quilt feathers into the background patches. These are irregular shaped 6-sided patches that are formed where the two different blocks join in the quilt. As I quilted the feathers, I took step-by-step photos of the process to post to my blog. This will give you an idea of how I quilt my freehand feathers. There are many different ways to quilt feathers as there are quilters. I have taken various techniques leanred from different quilters and combined them along with my own techniques to quilt free-hand feathers. Here is the photo of the patch before quilting. Here I have quilted in the spine - or the vein - of the feather. I start at the bottom and quilt a single feather at the tip of the spine. I tie off at this point and start back at the bottom of the spine to start my feathers. Here I have quilted in the 1st 3 feathers on the outside of the feather spine. The first feather I quilt is formed in a...

Dick and Jane

Image
The Dick and Jane quilt top is completed and waiting to be quilted. It is hanging on my design wall while I work on another quilt that is on the machine. This quilt is 47x61 inches - a good size for my youngest DD to cuddle under. I'll bind it in the gold fabric and will be using a poly batting and an overall quilting pattern. Susan

Feather Talk

Image
I have received several comments on my feather sampler quilt and want to thank each of you for being so kind. Feathers weren't easy for me to learn, but once I did they have become my favorite quilting pattern. The first feathers I learned were what I call "longarm feathers". This is where you quilt in the spine of the feather and then quilt the feathers one on top of the other backtracking along the long edge of the feather. I could never get those feathers to look nice and neat and consistant. So I turned to stencils and transferred the pattern onto the quilt top with an air soluble or water soluble pen, or chalk pencil or pounce pad. They were much better, but it was difficult to find stencils to fit the spaces where I wanted to quilt feathers. So I kept practicing. Then I took a class from Karen McTavish at MQS back in 2003. Her method of backtracking over the tops of the feathers instead of the long side of the feathers made a huge difference in the way my feathers l...

New Blog Look

My blog has a new look! I've been playing around with changes on this blog for quite a while and have finally settled on a new layout from The Cutest Blog on the Block. I may have to continue tweaking the fonts to make them more readable, but so far I like the way it has turned out.

Wonder Block & Dick and Jane

Image
The Wonder Block quilt is quilted and the binding is stitched to the front of the quilt waiting for the hand stitching to the back. This is the quilting design I chose. It's a freehand design that I haven't quite fully developed yet. It still needs some work, but this was a good quilt to try it on. The front of the quilt after it was quilted. I used a 6 oz poly batting. The muslin backing helps me see the quilting so I can tell where the quilting pattern needs some tweaking. This is the Dick and Jane quilt I'm working on for my youngest DD. The main body of the quilt will have a 2 inch inner border of dark blue with a 4 inch outer border of the daisy print. The small pieces at the top of the photo will be enlarged with the daisy print to the same size as the blocks and will be the first row in the quilt - at least that is the plan for now. Knowing me, it's likely I'll change my mind once I get to piecing the top.

Wonder Block Quilt

Image
This is a set of block patterns designed by Terry Martin in her book, " Wonder Blocks - Stack, Cut, Sew, and Go." They are all made from squares and rectangles - no triangles at all, so they really are easy and fast to cut and stitch together. The book includes 7 block designs and I used them all plus several more that I designed myself using the same sized units that Terry gives in her book. The biggest challenge for me was knowing when to stop piecing the blocks! This is an addicting design. I used 16 fat quarters and pieced 108 blocks, using 100 of them in this top set 10x10. The blocks are 6 inches square so I now have a nice 60x60" top to quilt. I've decided not to put a border on this top and just quilt it and bind it. Tomorrow I'll decide on a quilting design and hopefully have it finished for the guild meeting on Tuesday night. My design wall is a bit short for this size quilt. I laid out the first 7 rows on the wall and the last 3 rows were laid out on...

Feather Sampler

Image
The new batteries are in the camera at last! Now I'm able to take photos of the Feather Sampler quilt. These are a couple of the blocks with the Filigree Feathers quilted in them. Here you can see the cross-hatched loops in the sashing strips. I have several heart filigree designs in my sketchbook. This one of several variations. This double heart is not one that I'm completely happy with. It still needs a bit of tweeking to make it a good feather pattern. It does make a great filigree pattern, though. This is the quilt on my bed. The pink you see at the foot of the bed is from the 1930's repo quilt that I have had on the bed for a while now. The plastic bag next to the night stand contains some cotton yarn I just bought to crochet dishcloths with.

More Feathers

Image
Here are 3 more feathers I quilted in the Feather Sampler quilt. This is the back of the quilt. The quilting doesn't show up very well on the front in photos since the fabric is so busy. I still need to buy those batteries so I can take photos of the front of the quilt. This photos shows the sashing quilting a bit better. I cross-hatched loops in the sashes and made a standard cross-hatch in the setting squares.

Filigree Feathers

Image
Here are some photos of the quilt I made from a Moda Layer Cake in the Simplicity line. These are my own feather designs that I developed from my "Filigree" quilting designs. I call these "Filigree Feathers". The quilt has 49 blocks and each block has a different variation of one of 10 patterns. I used this quilt as a quilting sampler. Once I get the batteries changed in the camera, I'll take a photo of the front of the finished quilt. The batteries went dead in the middle of the photo shoot.

Fall Colors

Image
The fall colors are past their peak here in mid-Missouri, but with the help of my kids, I did manage to snap a few shots this past week. This first photo is the red maple tree in our front yard. My oldest DD took this photo. Here is a bush with purple berries against chartreuse leaves. This bush is at our local nature center. I probably take photos of this bush everytime we go there. A close-up of the berries. Thanksgiving plans are underway with ideas for cooking and baking. Apple, cherry and pumpkin pies. Roasted turkey, stuffing, and cranberry sauce. Mashed potatoes, candied yams, scalloped mushrooms, and green bean casserole. All family favorites that will be served along with a few other dishes. Not forgetting the turkey noodle soup that mom makes the day after Thanksgiving. Then Christmas is right around the corner. I have friends who started their Christmas shopping weeks ago, and then there is me - I have just now started thinking about Christmas! This time of year always...

Feather Photos

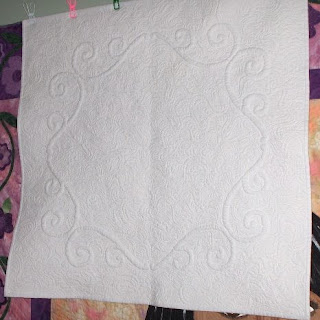
As Karen from The Quilt Rambler mentioned in a comment, the feather photos from the previous post are easier to see the quilting on if you click on the photo. They will pop up in another window in a larger format. My photography skills aren't the best and I'm a bit limited by my studio lighting so the photos are not great quality. The thread I'm using matches the fabric pretty well, too, and that always makes the quilting harder to see in photos. I've finished the borders of the quilt as well as the outer cornerstones. I don't have updated photos yet, but will post them (if they come out) in a few days. Susan

Quilting Lessons

Image
This is a photo of a Twisted Square quilt I made several years ago on a day when I wanted immediate satisfaction from my work. It's a small wallhanging and used fat quaters. It was fun and quick and a pattern I had not used before. My oldest daughter is starting a chapter in geometry in her math book this week. Since I love to inject hands-on projects into homeschooling whenever I can, nothing will do but to design and make a quilt! Even though this Twisted Square quilt is a great quilt for reinforcing the properties of angles, we are going to start with a quilt using squares and rectangles for ease of sewing. We'll get to the Twisted Square next. I brought home a book from the library that has a really fun set of blocks that should be easy to sew together into a top. It's "Wonder Blocks: Stack, Cut, Sew and Go", by Terry Martin. She gives the patterns for 7 different blocks in her book and directions for using them in 4 different quilts. My daughter and I desig...

Cleaning House

Image
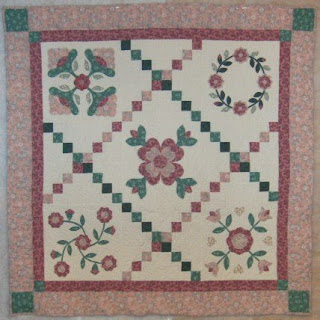
I'm dedicating most of my time this week to cleaning my house. This is my deep cleaning where I steam carpets, etc. I have a white carpet in my living room and dining room that is really hard to keep clean, so I end up cleaning the carpet at least once a month-ugh! That carpet will be history soon as we are installing hardwood floor sometime this winter, but in the meantime I still have this compulsion to do something to keep it presentable. So I'm taking a short break from quilting today. The girls and I are visiting the library for more books for school, then I'm tackling the carpet. Here's a photo of a quilt I completed back in 2002. It's from the book Rose Sampler Quilt. I hand appliqued these blocks using Eleanor Burns method of stitching interfacing to fronts of the applique pieces and slitting the interfacing, turning the pieces, pressing them and securing them in place on the block. My interfacing was a bit too heavy and I didn't like the results, but i...

Simplicity

Image
This afternoon I worked on the Simplicity layer cake quilt. I knew I wanted lots of feathers in this quilt and since I'm best at freehand feathers as opposed to commercial pattern feathers, I decided to just "go for it" and started quilting. This first photo is of a feathered heart. I cut a heart template from a piece of printer paper and traced around it in the center of the upper outer border with an air soluble marker. Then I freehand quilted the feathers using 40wt. Signature thread in Parchment. The feathers extended out from the feathered heart were a bit more difficult. I quilted and ripped out quilting 3 times before I finally got a feather that I liked. This border is 10 inches wide and I needed to add more extensions on the spine of the feather in order to fill up the space. I think it turned out well inspite of the 2 hours it took me to do one side of one border! The other 3 sides of this border should go faster now that I have this first one done and the patte...

Studio Changes Part 2

Image
Yesterday afternoon, I moved things around in my studio again. I moved the metal shelving unit onto the wall next to the cutting table to give me room to move the ironing board to the right of the sewing table. The idea is to use the flat-panel door (propped up behind the ironing board in this photo) as a "big board" on top of the ironing board. I have to get some cleats attached to the door before it will be used, or get some sawhorses to use as legs for the door to make it more stable. I was trying to press 5 yards of 102" wide backing fabric on my regular ironing board yesterda-ugh! What a disaster! I did finally manage to finish the pressing job and get the fabric cut and loaded onto the machine. You may recognize this quilt. It's the blocks that I had pinned up on the design wall for months waiting to be sewn together. Once I got the folding table for the domestic sewing machine I had the incentive to get the blocks stitched together. I decided it was time to ge...