Zipper Leader Tutorial - Part 2
You are now ready to attach the zipper to your leader using your domestic sewing machine. You have to decide which way you want your zipper to lay - with the closed tab to the right of your machine or to the left. I chose to have the tab to the right side of my machine as I'm standing on the free-hand size.
This first zipper leader is for the "Take Up Roller" leader on your machine. The directions are for the closed pull tab to be on the right side.
Step 1. Start with the closed zipper facing right side up and the tab to the right. The canvas is also right side up. Match the center mark of your closed zipper to the center mark on the leader with the 1/2" fold. The fold of the canvas is positioned right up against the zipper teeth. The closed tab is positioned on the right side. Pin in place. .

Step 2. Start stitching the canvas at the center mark. Use a zipper foot and a straight stitch on your domestic sewing machine. I used a 3.0 stitch width. Stitch to the end of the canvas.

Step 3. Turn the zipper and leader around and start again from the center and stitch to the other end.

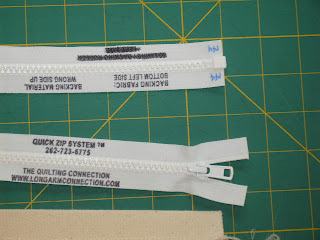
Here is a photo of the zipper stitched on the canvas leader.

Mark you leader as "Pick Up Roller" with a permanent pen.
This first zipper leader is for the "Take Up Roller" leader on your machine. The directions are for the closed pull tab to be on the right side.
Step 1. Start with the closed zipper facing right side up and the tab to the right. The canvas is also right side up. Match the center mark of your closed zipper to the center mark on the leader with the 1/2" fold. The fold of the canvas is positioned right up against the zipper teeth. The closed tab is positioned on the right side. Pin in place. .

Step 2. Start stitching the canvas at the center mark. Use a zipper foot and a straight stitch on your domestic sewing machine. I used a 3.0 stitch width. Stitch to the end of the canvas.

Step 3. Turn the zipper and leader around and start again from the center and stitch to the other end.

Here is a photo of the zipper stitched on the canvas leader.

Mark you leader as "Pick Up Roller" with a permanent pen.
Next we'll attach this zipper leader to the Pick Up Roller canvas that is alread attached to your Longarm machine.

Comments